|
|
Rebuild a Door
If your key is hard to turn or the locks and latches are hard to operate,
then this will really help you out.
Tools you'll need:
1. Standard screwdriver
2. Phillips screwdriver
3. 5 mm allen wrench (preferably a socket)
4. 10 mm wrench
5. 10 mm socket
6. 6 cans of brake cleaner
7. 1 can of aerosol white lithium grease
8. Plastic bristled parts cleaning brush
Parts you'll need:
1. Exterior door handle seals
2. Lock cylinder seal
Start by taking off the door panel.

Next remove the interior door handle by unscrewing the two bolts with a 10 mm
socket. Unclip the rod by pulling the tab off the rod end and moving it out
of the way.
Once you have the interior handle free, clean off all the old grease with
the brake cleaner and the brush. Apply a liberal amount of white lithium
grease to all moving parts and reinstall.
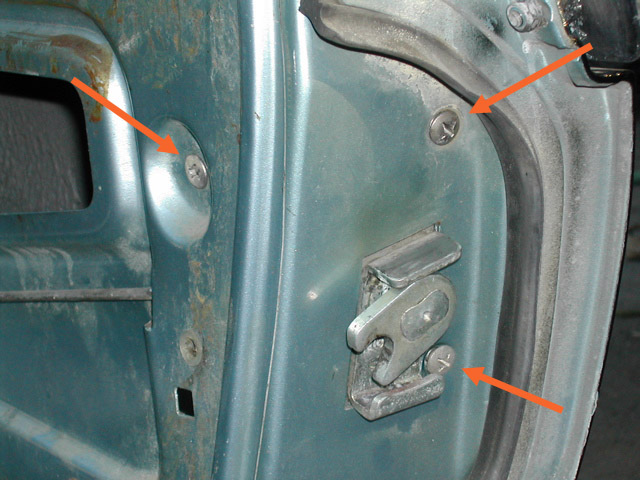
Remove the exterior door handle by removing the nut that hides behind
the handle flap on the outside edge of the door and using your 5 mm
allen tool to remove the bolt inside the door cavity.

Set the door handle aside for now. Remove the door latching mechanism
by first turning the actual latch so that it is straight up and down.
If you don't do this it won't fit through the rectangular hole in the
door and you'll wonder why you can't get it out. Remove the clip from
the rod that goes to the interior door handle. It's the same style of
clip as before. Remove the three phillips head bolts that hold the
mechanism in place.
Remove all the old grease from the latching mechanism and apply a liberal
amount of lithium grease to all moving parts. Reinstall the latching mechanism.
Reattaching the rod clip is a test in patience.
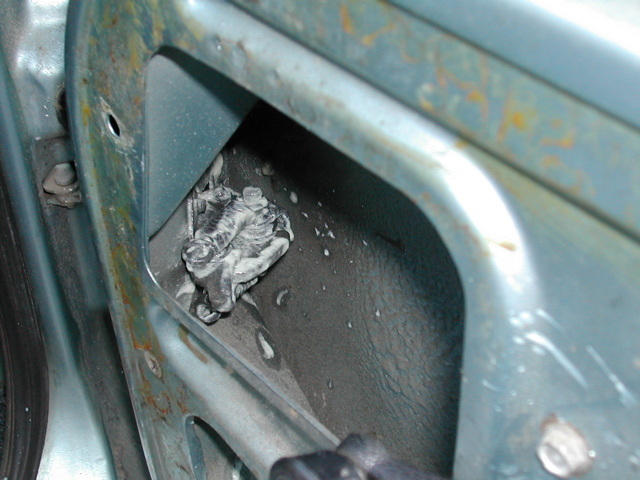
Now for the most complicated piece. On a clean work area with plenty of
good bright light place some white paper towels. Remove the phillips bolt
from the back of the latch and remove the cam. Be careful because
there is a spring back there. It probably won't go flying across the
room, but be careful anyway. Once the cam is off, put your key into
the lock cylinder and pull the cylinder out of the handle. Set the
handle aside for now.
Right now, with the key still in the
cylinder everything is safe. Once you remove the key from the
cylinder you're officially in the danger zone. There are a lot of
small pieces to lose but if you're careful you won't have any
problems.
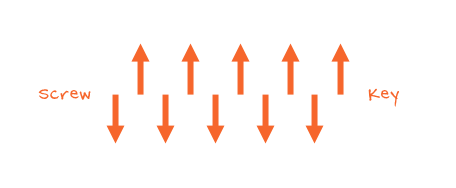
Before we jump in notice how the lock plates all sit flush with the
lock cylinder. They don't stick out on either side. Take a deep
breath and let's do it. SLOWLY remove the key from the cylinder
making sure that none of the lock plates fall out of their slots.
You'll notice that there are 10 plates in all, 5 on each side of the
cylinder. You'll also notice that the plates are off set, one side is
closer to the keyhole. This is important to remember so that you
don't forget which plate goes in where. If you put the plates in the
wrong holes, you won't be able to put the cylinder back into the
handle and you'll have to fiddle around with it for a lot longer
time. Print out the image below and use it to help you keep track of
the plates. Put the plates themselves at the end of each arrow. That
way when you put it back together there's no chance of confusion.
Carefully pull out the lock plates one by one and place them on their
appropriate places on the paper. Be extra careful of the small springs under
the plates. Sometimes the springs will stick to the plates and try to come out
at the same time. If they come out it's okay, just set them to the side,
just be careful not to loose them. Once you have all the plates out
use a pick to remove all the springs from their bores. You don't have
to keep the springs in order, they're all the same.
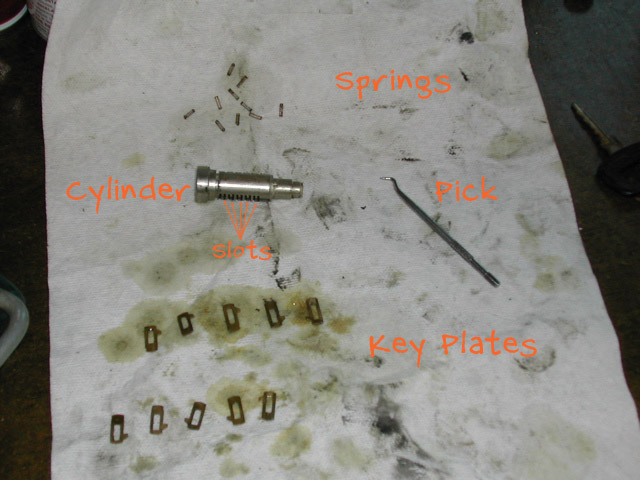
Carefully clean the old grease off the springs and lock plates with
brake cleaner. Be very careful with the springs. They're easy to drop
and hard to find. Once the plates and springs are clean, then clean
out the cylinder itself. When everything is clean, apply a liberal
amount of lithium grease to the cylinder and carefully place the
spring back into the bores on one side. You can use the pick again if
you have fat fingers. Place the appropriate plates into the slots.
Make sure you are holding the cylinder in the correct orientation and
get the right plates in the right places. Once you have all the
plates on one side, do the other. Keep a finger over the plates you
already put in to keep them from falling out. Now that they're clean
they have a tendency to do that. Once all 10 plates are installed put
your key back into the cylinder to hold everything in place. With the
key in place nothing will fall out. Look at the plates and make sure
they are all sitting flush like before we started. If some are
sticking up too much you'll have problems. If you have an old worn
down key you might have some plates that stick up higher than others.
Just make sure everything looks like it did before we started. If
everything looks okay, then apply more lithium to the cylinder, clean
the bore in the handle, spray lube into the handle and insert the
cylinder into the bore. Make sure it sits flush, if not turn the
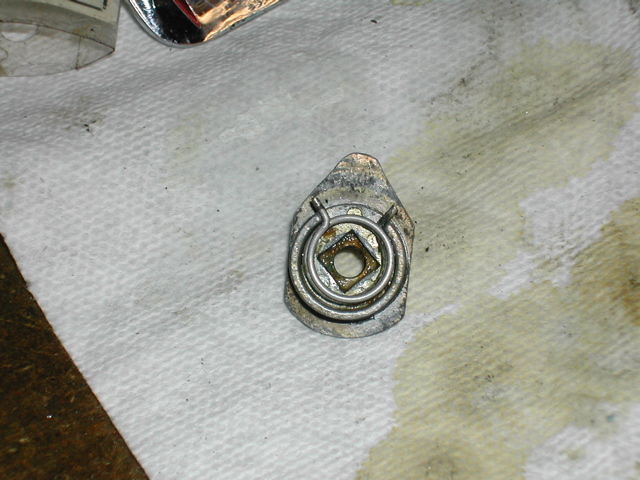
cylinder over 180 degrees and try again. Install the spring as
pictured and screw the cam back onto the back of the cylinder and
reinstall the handle.
WHEW! The hard part is done and it's almost over.
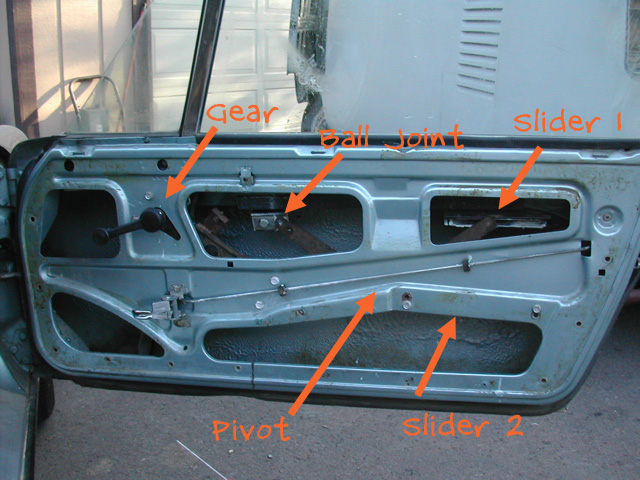
Take this opportunity to lube with window mechanisms. I'll explain the
late style (mid 73 and later). There are two sliders, one just below the
window glass and one bolted to the back of the door bracing that you
can't see. There is a ball joint under the window glass, the gear
that operates the mechanism is hard to see, but you can spray it with
the lithium. And finally there's a pivot point where the arms come
together. Spray everything that moves.
Also, spray some lube on the door stay.
Reinstall the door panel and enjoy the new smooth action!
|
|