Home  |  Forums  |  914 Info  |  Blogs
 
914World.com - The fastest growing online 914 community!
 
Porsche, and the Porsche crest are registered trademarks of Dr. Ing. h.c. F. Porsche AG. This site is not affiliated with Porsche in any way.
Its only purpose is to provide an online forum for car enthusiasts. All other trademarks are property of their respective owners.
 

Welcome Guest ( Log In | Register )

2 Pages V  1 2 >  
Reply to this topicStart new topic
> Wiring Harness Plastic Sheathing?
TINKERGINEERING
post Jun 6 2024, 06:26 PM
Post #1


Member
**

Group: Members
Posts: 190
Joined: 15-March 20
From: Sierra Madre, CA
Member No.: 24,031
Region Association: Southern California


Currently working on the wiring harness and found a couple wires in desperate need of replacement but they go through this plastic sheathing on the harness. Has anybody replaced wires through this sheathing? Should I just pull the wires out and try and jam them back in? I was also thinking I could just replace the sheathing, because it is 50 years old now, but how would I put new sheathing back on?
Thanks so much


Attached thumbnail(s)
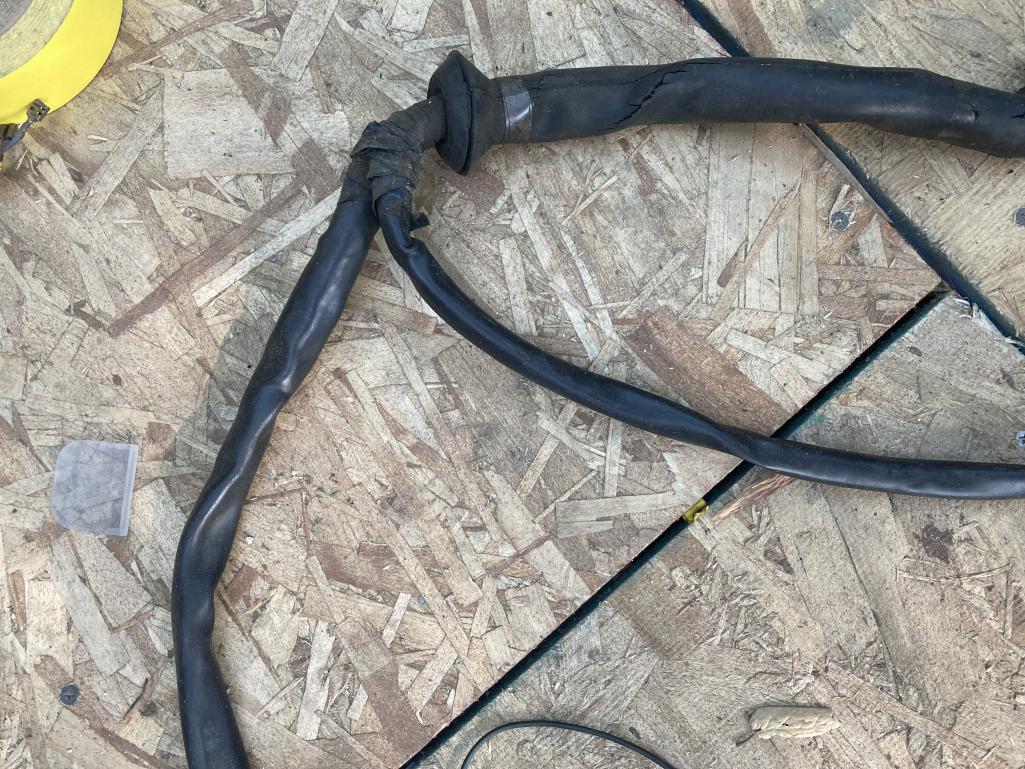
Attached Image
User is offlineProfile CardPM
Go to the top of the page
+Quote Post
windforfun
post Jun 6 2024, 06:40 PM
Post #2


Senior Member
***

Group: Members
Posts: 1,920
Joined: 17-December 07
From: Blackhawk, CA
Member No.: 8,476
Region Association: None


Tie or tape a string to the wire you're replacing. Replace the wire & then tie the string to it. Pull on the string to pull the new wire back through the sheathing. Be careful not to kink the new wire. Electricians do this all the time when replacing wiring in conduit - especially with soft stranded wire. Sometimes a stretched out coat hanger works too if it's long enough. BTDT.

(IMG:style_emoticons/default/beer3.gif) (IMG:style_emoticons/default/beer3.gif) (IMG:style_emoticons/default/beer3.gif)
User is offlineProfile CardPM
Go to the top of the page
+Quote Post
bdstone914
post Jun 6 2024, 10:00 PM
Post #3


bdstone914
****

Group: Members
Posts: 4,591
Joined: 8-November 03
From: Riverside CA
Member No.: 1,319


Pulling the new wire thru by attaching it to the old wire may work depending on the lenght of the wire.
They make lube for stringing wires. If it does not work you can cut off the sheath and replace it with shrink tubing. Not original but i think you are going electric so that may not be an issue.
User is online!Profile CardPM
Go to the top of the page
+Quote Post
Chris914n6
post Jun 8 2024, 12:11 AM
Post #4


Jackstands are my life.
****

Group: Members
Posts: 3,366
Joined: 14-March 03
From: Las Vegas, NV
Member No.: 431
Region Association: Southwest Region


There is no reason not to modernize it. A split loom of your choice and TESA tape for the ends. You are likely going to add wires thru the snorkel at some point.

Gander under the hood of a modern car for reference.

Factory sheathing was originally soft and flexible. Not so much decades later...
you could probably heat it with a hair drier to soften it enough to slide it off in one piece if you think you might want to use it later.
User is offlineProfile CardPM
Go to the top of the page
+Quote Post
IronHillRestorations
post Jun 8 2024, 06:13 AM
Post #5


I. I. R. C.
*****

Group: Members
Posts: 6,742
Joined: 18-March 03
From: West TN
Member No.: 439
Region Association: None


I have some sizes of black PVC tubing (I call it jacketing) that I use in making 914-6 engine harnesses. I don’t have a 914 right now so I can’t measure. Do you know what size you need? I also have large non adhesive heat shrink that might do well for you. With all due respect to Chris, plastic split loom would look out of place on a 914.
User is online!Profile CardPM
Go to the top of the page
+Quote Post
SirAndy
post Jun 8 2024, 09:39 AM
Post #6


Resident German
*************************

Group: Admin
Posts: 41,741
Joined: 21-January 03
From: Oakland, Kalifornia
Member No.: 179
Region Association: Northern California


QUOTE(Chris914n6 @ Jun 7 2024, 11:11 PM) *

There is no reason not to modernize it.

(IMG:style_emoticons/default/agree.gif)

For your use-case, you shouldn't really rely on 50+ year old wires, especially if they're hidden inside a casing and you can't inspect them.

At a minimum, i would remove all the casing, replace anything suspect and then re-wrap the harness.
(IMG:style_emoticons/default/popcorn[1].gif)
User is online!Profile CardPM
Go to the top of the page
+Quote Post
dr914@autoatlanta.com
post Jun 8 2024, 10:58 AM
Post #7


914 Guru
*****

Group: Members
Posts: 7,948
Joined: 3-January 07
From: atlanta georgia
Member No.: 7,418
Region Association: None


Jeff Bowlsby
User is offlineProfile CardPM
Go to the top of the page
+Quote Post
Superhawk996
post Jun 8 2024, 11:11 AM
Post #8


914 Guru
*****

Group: Members
Posts: 6,184
Joined: 25-August 18
From: Woods of N. Idaho
Member No.: 22,428
Region Association: Galt's Gulch


If you really want to do wiring to a high standard, I HIGHLY recommend you spend some time looking at the wiring for @tygaboy LS conversion. I’m sure if you PM Chris, he would have excellent advice for you.

Electrical work is around page 192
http://www.914world.com/bbs2/index.php?sho...900&st=3820

The wiring in that project was done to a standard as if it were done by a professional .

The use of Deutche connectors, Kapton tape, and Raychem jacketing is the way to go. This will give you solid reliability and modern connection upgrades over the 60’s vintage connectors you’ll find in a 914.
User is online!Profile CardPM
Go to the top of the page
+Quote Post
TINKERGINEERING
post Jun 8 2024, 11:31 AM
Post #9


Member
**

Group: Members
Posts: 190
Joined: 15-March 20
From: Sierra Madre, CA
Member No.: 24,031
Region Association: Southern California


Thanks everyone! So if I were to replace the PVC tubing itself, how would I thread all the wires back in? typically one would most likely just have a bunch of new wires without the connectors and add them on after everything was threaded through, but if some of my wires still functioned properly and had good strong connectors, I would preferably not want to replace those. How would you thread wires with connectors in? Just the same way as you guys described with the string?
User is offlineProfile CardPM
Go to the top of the page
+Quote Post
Superhawk996
post Jun 8 2024, 11:38 AM
Post #10


914 Guru
*****

Group: Members
Posts: 6,184
Joined: 25-August 18
From: Woods of N. Idaho
Member No.: 22,428
Region Association: Galt's Gulch


Spend some time on YouTube learning how to de-pin connectors
https://youtu.be/Vt_rAIKPlWA?si=2n7Jm-KKKMoxBn8Q


The ability to de-pin connectors is a game changer and will allow you to run wiring through Raychem sleeve without worrying about fitting the connectors through. After the wiring is pulled through, re-pin the connectors. 914 connectors are very easy to de-pin vs other more modern connectors.

Use of spit convolute and the ability to put it on wiring harnesses without connectors having to be removed is its only redeeming characteristic.
User is online!Profile CardPM
Go to the top of the page
+Quote Post
tygaboy
post Jun 8 2024, 02:41 PM
Post #11


914 Guru
*****

Group: Members
Posts: 5,377
Joined: 6-October 15
From: Petaluma, CA
Member No.: 19,241
Region Association: Northern California


QUOTE(Superhawk996 @ Jun 8 2024, 10:11 AM) *

If you really want to do wiring to a high standard, I HIGHLY recommend you spend some time looking at the wiring for @tygaboy LS conversion. I’m sure if you PM Chris, he would have excellent advice for you.

Electrical work is around page 192
http://www.914world.com/bbs2/index.php?sho...900&st=3820

The wiring in that project was done to a standard as if it were done by a professional .

The use of Deutche connectors, Kapton tape, and Raychem jacketing is the way to go. This will give you solid reliability and modern connection upgrades over the 60’s vintage connectors you’ll find in a 914.


@Superhawk996 - You're too kind! Thanks for the compliments.
@TINKERGINEERING - If there's anything I can help you with, please feel free to message me and we can chat. I think you'll really enjoy the world of electrical stuff!
User is offlineProfile CardPM
Go to the top of the page
+Quote Post
TINKERGINEERING
post Jun 8 2024, 03:15 PM
Post #12


Member
**

Group: Members
Posts: 190
Joined: 15-March 20
From: Sierra Madre, CA
Member No.: 24,031
Region Association: Southern California


QUOTE(Superhawk996 @ Jun 8 2024, 10:38 AM) *

Spend some time on YouTube learning how to de-pin connectors
https://youtu.be/Vt_rAIKPlWA?si=2n7Jm-KKKMoxBn8Q


The ability to de-pin connectors is a game changer and will allow you to run wiring through Raychem sleeve without worrying about fitting the connectors through. After the wiring is pulled through, re-pin the connectors. 914 connectors are very easy to de-pin vs other more modern connectors.

Use of spit convolute and the ability to put it on wiring harnesses without connectors having to be removed is its only redeeming characteristic.


so the spade ends that go into them will fit through just fine? thats the only thing Im worried about
User is offlineProfile CardPM
Go to the top of the page
+Quote Post
SirAndy
post Jun 8 2024, 06:16 PM
Post #13


Resident German
*************************

Group: Admin
Posts: 41,741
Joined: 21-January 03
From: Oakland, Kalifornia
Member No.: 179
Region Association: Northern California


QUOTE(TINKERGINEERING @ Jun 8 2024, 02:15 PM) *

so the spade ends that go into them will fit through just fine? thats the only thing Im worried about

You may have to remove the spade connectors on the ends but you can re-crimp them easily with a good crimping tool.

There's also no need to cut the connectors off at all, you can undo the factory crimp if needed.
(IMG:style_emoticons/default/bye1.gif)
User is online!Profile CardPM
Go to the top of the page
+Quote Post
ClayPerrine
post Jun 8 2024, 06:20 PM
Post #14


Life's been good to me so far.....
***************

Group: Admin
Posts: 15,649
Joined: 11-September 03
From: Hurst, TX.
Member No.: 1,143
Region Association: NineFourteenerVille


I am currently adding lots of wires to my harness for the MS3Pro ecu. I have been putting them through the tunnel, and up the new snorkel tube to reach into the engine compartment.

I have found that you can use the existing wires, if they are long enough. Just pull one of the existing wires back until a section that was at the far end is inside where you need to start adding wires.

Then get a new, throw away wire, and tape it to the existing wire and pull it through the sleeve. Once it is in there, use it to pull the rest of the wires through the sleeve. The original wire is still in the harness, and you have your new ones pulled through.

Sometimes you have to break it into sections if you want to make it really go though the chassis. I can't pull wires though from the inside of the car and up through the snorkel all in one pass. I have to break that into two pulls, one from the inside to the outside, and one up the snorkel.

Hope that helps.

Clay
User is offlineProfile CardPM
Go to the top of the page
+Quote Post
windforfun
post Jun 8 2024, 06:46 PM
Post #15


Senior Member
***

Group: Members
Posts: 1,920
Joined: 17-December 07
From: Blackhawk, CA
Member No.: 8,476
Region Association: None


QUOTE(SirAndy @ Jun 8 2024, 05:16 PM) *

QUOTE(TINKERGINEERING @ Jun 8 2024, 02:15 PM) *

so the spade ends that go into them will fit through just fine? thats the only thing Im worried about

You may have to remove the spade connectors on the ends but you can re-crimp them easily with a good crimping tool.

There's also no need to cut the connectors off at all, you can undo the factory crimp if needed.
(IMG:style_emoticons/default/bye1.gif)


Undoing the crimping will usually leave a damaged wire. Usually, but not always. This is poor workmanship.

Crimp, solder, & then cover with shrink tubing. This is how Mercedes does it. Oh & BTW, don't cut any strands. Crimping alone isn't really quality.
User is offlineProfile CardPM
Go to the top of the page
+Quote Post
Chris914n6
post Jun 8 2024, 11:09 PM
Post #16


Jackstands are my life.
****

Group: Members
Posts: 3,366
Joined: 14-March 03
From: Las Vegas, NV
Member No.: 431
Region Association: Southwest Region


You can get bailing wire at lowes/hd. Smaller in diameter than coat hanger and tougher than copper wire. Bend the end over as a hook and tape to the wire. You can't push wire thru but you can pull it easy enough. I've actually broken wire from pulling too hard because it was wrapped around other wires and the friction was too much.

The pins can be staggered to reduce the overall diameter if you are pulling a bunch at a time.

Most OEMs don't solder the connectors. It's debatable why, but if Porsche didn't do it then you don't need to.
User is offlineProfile CardPM
Go to the top of the page
+Quote Post
Superhawk996
post Jun 8 2024, 11:20 PM
Post #17


914 Guru
*****

Group: Members
Posts: 6,184
Joined: 25-August 18
From: Woods of N. Idaho
Member No.: 22,428
Region Association: Galt's Gulch


QUOTE(windforfun @ Jun 8 2024, 08:46 PM) *


Crimp, solder, & then cover with shrink tubing. This is how Mercedes does it. Oh & BTW, don't cut any strands. Crimping alone isn't really quality.

Please be careful with this advice as it is a misrepresentation of the approved Mercedes repair procedure.

Crimping alone is standard practice in automotive wiring for new construction of harness.

Yes, there are instances where Mercedes authorizes a solder repair in the field, but they are not done with old fashioned soldering iron, and shrink tubing.

Attached Image
User is online!Profile CardPM
Go to the top of the page
+Quote Post
technicalninja
post Jun 9 2024, 12:06 AM
Post #18


Senior Member
***

Group: Members
Posts: 1,614
Joined: 31-January 23
From: Granbury Texas
Member No.: 27,135
Region Association: Southwest Region


I'll add another issue you will have to overcome.

All the previous advice is for the standard automotive wiring that we are all accustomed too.

You will have MUCH higher voltage and amperage for your drive package.

I am well acquainted with standard 12V stuff; I don't have to research methods or tricks.

I would do a DEEP dive into the EV world regarding best practices for your chosen drive package. The EV geeks may have different procedures for the high amperage stuff.

Be careful here! You can hurt yourself if you don't have all of the necessary info.

One of my acquaintances, who is Tesla swapping an MR2, built a pretty serious electric go cart...
It "got away" from him in his shop and did a bunch of damage before they were able to kill it.
Had it been the MR2 folks might have gotten killed.
It was a wiring issue that caused the run-away...

If you haven't joined an EV forum yet that is the single most important thing you need to do IMO.

I've never even looked for an EV forum, so I don't have a good recommendation.

Maybe someone else does.

You need an "experimental" friendly forum.

A bunch of "tinkerers" is exactly what I'd be hunting in your shoes...
User is online!Profile CardPM
Go to the top of the page
+Quote Post
technicalninja
post Jun 9 2024, 12:26 AM
Post #19


Senior Member
***

Group: Members
Posts: 1,614
Joined: 31-January 23
From: Granbury Texas
Member No.: 27,135
Region Association: Southwest Region


@TINKERGINEERING

This is a message I want your father to read!

If one of my children was doing what your daughter is, I'd DEMAND easy to access kill switches, both internal and external on the car.

I like the pull to engage/push to disengage big buttons, similar to the blade drives on lawnmowers.

The dash unit would be centered to allow activation by either passenger or driver.

The outside unit would be EASY to get to and I'd probably have "rescue" arrow pointing to it much like kill switches on track cars.

Imagine a first responder having to deal with the car. Plan accordingly!

I'd make it EASY to take the drive package all the way down.

I wouldn't allow any "test drives" before the "kills" were operational.
User is online!Profile CardPM
Go to the top of the page
+Quote Post
TINKERGINEERING
post Jun 9 2024, 02:37 PM
Post #20


Member
**

Group: Members
Posts: 190
Joined: 15-March 20
From: Sierra Madre, CA
Member No.: 24,031
Region Association: Southern California


QUOTE(technicalninja @ Jun 8 2024, 11:26 PM) *

@TINKERGINEERING

This is a message I want your father to read!

If one of my children was doing what your daughter is, I'd DEMAND easy to access kill switches, both internal and external on the car.

I like the pull to engage/push to disengage big buttons, similar to the blade drives on lawnmowers.

The dash unit would be centered to allow activation by either passenger or driver.

The outside unit would be EASY to get to and I'd probably have "rescue" arrow pointing to it much like kill switches on track cars.

Imagine a first responder having to deal with the car. Plan accordingly!

I'd make it EASY to take the drive package all the way down.

I wouldn't allow any "test drives" before the "kills" were operational.


Hey there! Daniel here- Frances shared these posts. Yes Great intel and advice all around. Kill points are a great topic. ALA race disconnect style front an back is a good point.
Frances has teamed up and gone thought the LEGACY EV course for the HV side of things. Correct - completely separate system 2/0 3 phase separate control cabeling and BMS setups.
This current process of just getting in a 12v functioning harness is the job. This one has been hacked a bit so replacing strands with fresh ones and crimped solder and heat shrinked is happening. The rubber / pvc tube shrouds cleaned up nice and see to have a few more miles on them. Just the rubber snorkel need replacing it seems. This was a super confusing task months ago and now the confidence is with her and Frances doesnt want me breathing down her neck - exact words HA
So huge thanks to all of you for taking the time to chime in and lend your lessons learned here. truly
Best
Daniel
User is offlineProfile CardPM
Go to the top of the page
+Quote Post

2 Pages V  1 2 >
Reply to this topicStart new topic
1 User(s) are reading this topic (1 Guests and 0 Anonymous Users)
0 Members:


- Lo-Fi Version Time is now: 26th July 2024 - 09:50 PM