|
|
|
Porsche, and the Porsche crest are registered trademarks of Dr. Ing. h.c. F. Porsche AG.
This site is not affiliated with Porsche in any way. Its only purpose is to provide an online forum for car enthusiasts. All other trademarks are property of their respective owners. |
|
|

  |

| VaccaRabite |
 Apr 25 2021, 12:53 PM Apr 25 2021, 12:53 PM
Post
#1
|
|
En Garde!  Group: Admin Posts: 13,419 Joined: 15-December 03 From: Dallastown, PA Member No.: 1,435 Region Association: MidAtlantic Region |
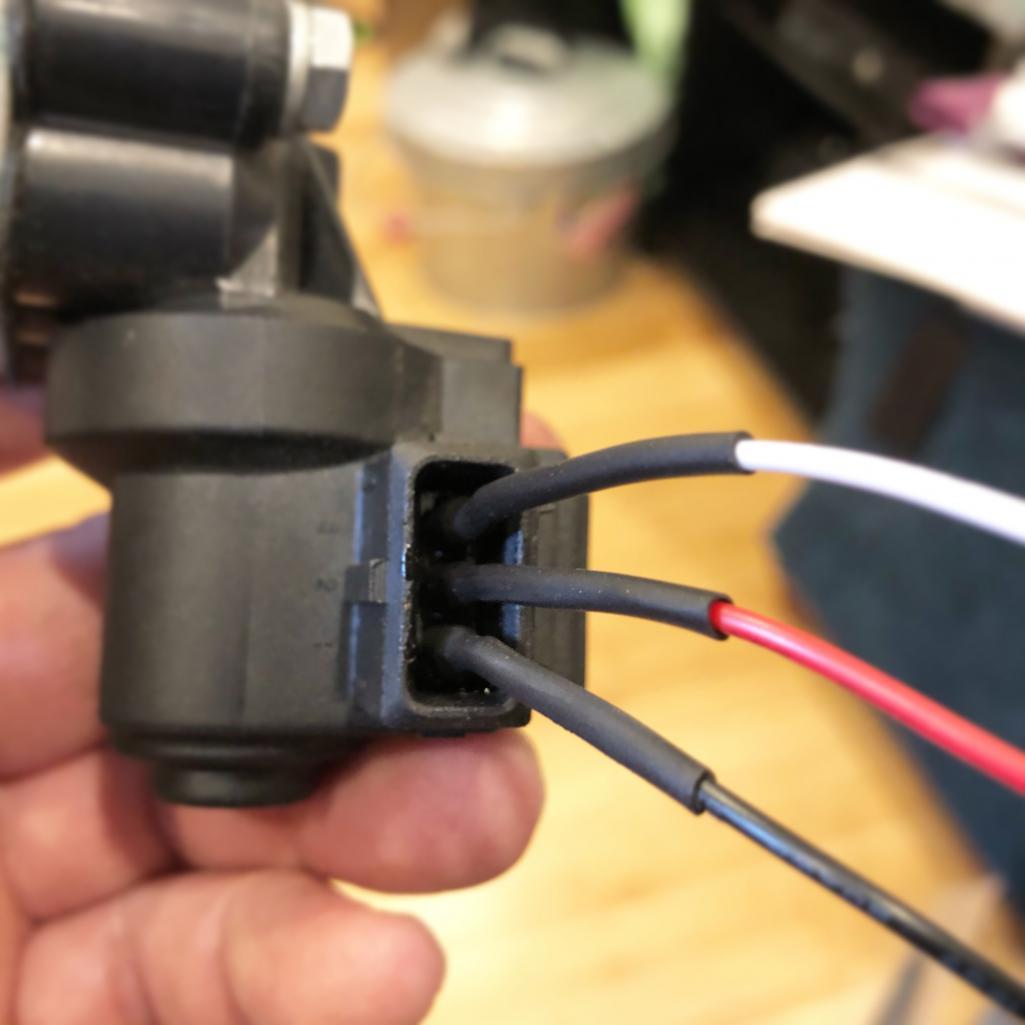 I broke the plug to my idle control valve. I bought a new plug housing. Easy. But I’ve had a devil of a time finding the right socket pins for the housing. Several weeks have been stalled waiting for 80 cents worth of pins that show up and are the wrong size. So, knowing the 914 has to drive next weekend, I went full DACO and soldered a pigtail of wires into the ICV and then crimped them into place. About to find out if it works, and will continue to work for a couple weeks while I sleuth out the right sockets for the plug Wish me luck! Zach |
   |

 
|
| 73-914 |
Apr 25 2021, 12:56 PM
Post
#2
|
|
Senior Member Group: Members Posts: 568 Joined: 24-April 10 From: Albany UpstateNY Member No.: 11,651 Region Association: None |
Sometimes you gotta do what you gotta do
|
 |
|
| Mark Henry |
Apr 25 2021, 01:13 PM
Post
#3
|
|
that's what I do! Group: Members Posts: 20,065 Joined: 27-December 02 From: Port Hope, Ontario Member No.: 26 Region Association: Canada |
My '67 bus I broke the shift rod coupler 1500 miles from home, I cobbled it together with wire from a paint can handle that I found on the side of the road to get home.
You do what you have to...and have AAA. (IMG:style_emoticons/default/biggrin.gif) |
|
|
|
| Montreal914 |
Apr 25 2021, 05:31 PM
Post
#4
|
|
Senior Member Group: Members Posts: 1,541 Joined: 8-August 10 From: Claremont, CA Member No.: 12,023 Region Association: Southern California |
|
|
|
|
| Beebo Kanelle |
Apr 25 2021, 05:54 PM
Post
#5
|
|
Member Group: Members Posts: 248 Joined: 22-November 12 From: Houston, Texas Member No.: 15,177 Region Association: Southwest Region |
Once, whilst stranded in Mexico, I had to build an entire VW Beetle out of coat-hangers just to get back to town...
Worked like a champ. Go for it. |
|
|
|
| VaccaRabite |
Apr 25 2021, 08:22 PM
Post
#6
|
|
En Garde! Group: Admin Posts: 13,419 Joined: 15-December 03 From: Dallastown, PA Member No.: 1,435 Region Association: MidAtlantic Region |
Bought another IAC and found a proper plug and pigtail on ebay. It will come in May, so my cludge will just have to work till then.
Zach |
|
|
|
| JamesM |
Apr 26 2021, 01:48 PM
Post
#7
|
|
Senior Member Group: Members Posts: 1,888 Joined: 6-April 06 From: Kearns, UT Member No.: 5,834 Region Association: Intermountain Region |
QUOTE(VaccaRabite @ Apr 25 2021, 06:22 PM)  Bought another IAC and found a proper plug and pigtail on ebay. It will come in May, so my cludge will just have to work till then. Zach I would just plug the line to the IAC, and open the air bypass on the throttle body for now and run without it. Once we get your idle mixture and warmup curve dialed in it wont be as much of an issue (for sure will be better than a cold start with carbs) maybe 20-30 seconds of feathering the throttle to avoid stalling, or possibly even just a low idle during warm up. I suspect the amount of air this was letting through was masking other issues with your idle quality that should be sorted out before enabling the IAC at all. Your car should be able to idle strong without it. |
|
|
|
| Mark Henry |
Apr 26 2021, 04:07 PM
Post
#8
|
|
that's what I do! Group: Members Posts: 20,065 Joined: 27-December 02 From: Port Hope, Ontario Member No.: 26 Region Association: Canada |
(IMG:style_emoticons/default/agree.gif)
The SDS in my bug doesn't even have an IAC as it's an option. When cold I let the fuel pump cycle, give it a couple of pumps as I start (as opposed to before I start) and that's it. I might have to keep the gas to it for a few seconds, depending how cold it is out. My new system for the /6 has an IAC but it doesn't look to me to be much more than an on/off air valve. I don't know for sure, but I think the fuel enrichment is nothing more than the MAP sensor seeing the vacuum change. |
|
|
|
| VaccaRabite |
May 1 2021, 01:15 PM
Post
#9
|
|
En Garde! Group: Admin Posts: 13,419 Joined: 15-December 03 From: Dallastown, PA Member No.: 1,435 Region Association: MidAtlantic Region |
https://www.youtube.com/watch?v=1BbU4JeyzMo Found an air leak on the throttle body with my homemade smoke machine. The cellophane is what I used to block smoke from going from the TB into the air intake box. The first time I did the test smoke just started rolling out the air intake box. Not helpful. The leak seems to be on the shaft that controls the butterfly. I’m guessing this is the source of my intermittent leak and high-at-times idle? Is this fixable or do I need to replace the TB? Also I’ve removed the IAC valve from the engine and gotten it to where it will idle fine once warm. Then it will suddenly want to idle a good bit higher I guess as the throttle shaft moves around.  Here is a pic of the smoke machine I made the other day. @JamesM Zach |
|
|
|
| Superhawk996 |
May 1 2021, 02:44 PM
Post
#10
|
|
914 Guru Group: Members Posts: 5,723 Joined: 25-August 18 From: Woods of N. Idaho Member No.: 22,428 Region Association: Galt's Gulch |
|
|
|
|
| VaccaRabite |
May 1 2021, 04:11 PM
Post
#11
|
|
En Garde! Group: Admin Posts: 13,419 Joined: 15-December 03 From: Dallastown, PA Member No.: 1,435 Region Association: MidAtlantic Region |
I am leaning towards replacing the TB with the larger until off a bus. As well as the throttle shaft leaking, the butterfly is sticking open, and engine power is way down without the IAC valve feeding more air into the engine.
The butterfly sticking open slightly is the cause of my intermittent very high idle. Don't know if its a carbon ring or just wear, but as the engine gets hot it sticks open more and the idle sits around 2000rpm until it finally closes some time later. Zach |
|
|
|
| BeatNavy |
May 1 2021, 04:24 PM
Post
#12
|
|
Certified Professional Scapegoat Group: Members Posts: 2,924 Joined: 26-February 14 From: Easton, MD Member No.: 17,042 Region Association: MidAtlantic Region |
You can ream out that shaft bushing in the TB and press in a new bronze one if you're getting a poor seal. There's a thread HERE by r3dplanet that is well documented. I still have a couple of leftover bearings and the bit, IIRC, that are needed. I'll send to you if you want.
Having said that, I'm curious about the bus TB as well. What cam do you have? I've had the Raby 9950 on a 2056 and now the 2270, and it just can't seem to get enough air the first couple of minutes after start up. |
|
|
|
| VaccaRabite |
May 1 2021, 09:28 PM
Post
#13
|
|
En Garde! Group: Admin Posts: 13,419 Joined: 15-December 03 From: Dallastown, PA Member No.: 1,435 Region Association: MidAtlantic Region |
I have the Raby version of the Web494 carb cam. His version has more exhaust duration. I used to know the cam number but now I don’t.
I went on a drive for about an hour. With the IAC out and not getting the air though that, my motor felt pretty down on power. You could very much tell that it was being choked off. I took the TB off tonight and there is a partial ridge where the butterfly meets the interior of the TB. That is I think where it’s hanging up as the engine gets hot. Also the change to go from the 45mm Tb to the 50mm Tb looks simple from the attaching standpoint. Basically take the lip off the plenum and that’s it. Well, and change the butterfly shaft so it’s clocked the right way and fab up a mount for my TPS that I need for Microsquirt. But that’s easy. Zach |
|
|
|
| VaccaRabite |
May 4 2021, 06:54 AM
Post
#14
|
|
En Garde! Group: Admin Posts: 13,419 Joined: 15-December 03 From: Dallastown, PA Member No.: 1,435 Region Association: MidAtlantic Region |
After reading this thread:
http://www.914world.com/bbs2/index.php?showtopic=244849 I bought a new 52mm Throttle Body from Bus Labs. This unit: 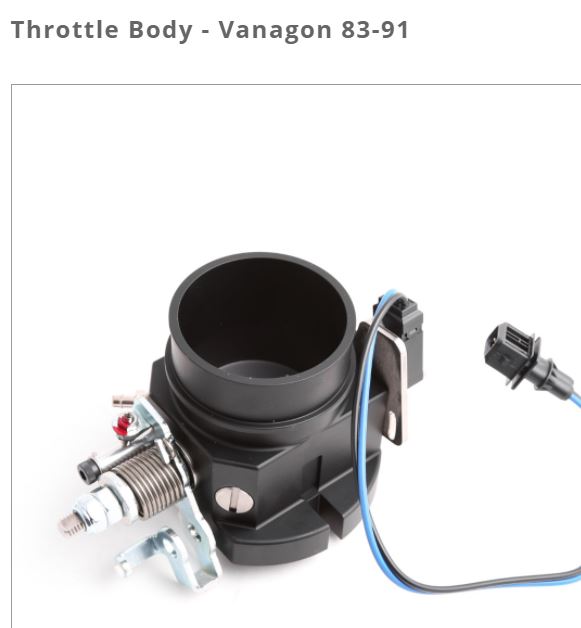 I looked at the GoWesty unit which is more stock looking, but they were not currently available. And the 2.1 Vanagon TBs I found all needed rebuilding if I bought them on Ebay. So my plan: I have a 400 mile drive coming up Memorial day weekend. If everything goes to crap, I plug my old TB back in and do it, and deal with an occasional high idle and knowing that I'm leaving almost 10% of power on the table at WOT. BUT if the new unit arrives on time, I have plenty of time to make a mount for my TPS (since I can't use the 2 position switch the Vanagon uses), expand the horn on the plenum, mount the unit and get at least one test drive in to collect data for James to adjust the tune if needed. Somehow its always a rush.... lol. I'm sure the day I leave I'll have the car on the lift to change SOMETHING last minute. Zach |
|
|
|
| nditiz1 |
May 4 2021, 07:23 AM
Post
#15
|
|
Senior Member Group: Members Posts: 1,177 Joined: 26-May 15 From: Mount Airy, Maryland Member No.: 18,763 Region Association: MidAtlantic Region |
Zach, please send build details of the smoke machine.
Thanks |
|
|
|
| VaccaRabite |
May 4 2021, 08:34 AM
Post
#16
|
|
En Garde! Group: Admin Posts: 13,419 Joined: 15-December 03 From: Dallastown, PA Member No.: 1,435 Region Association: MidAtlantic Region |
https://www.youtube.com/watch?v=tixozqgSwN0 He has a complete parts listing in the video description, but I used a lot of stuff I had at home. The important part I did not have was the pipe fittings (way cheaper at home depo) and the resistor wire - though even he used whatever welding wire he had. The resistance (Nicrom) wire needs considerably less for the winding around the wick. Zach |
|
|
|
| JamesM |
May 4 2021, 08:48 AM
Post
#17
|
|
Senior Member Group: Members Posts: 1,888 Joined: 6-April 06 From: Kearns, UT Member No.: 5,834 Region Association: Intermountain Region |
QUOTE(VaccaRabite @ May 4 2021, 04:54 AM) After reading this thread: http://www.914world.com/bbs2/index.php?showtopic=244849 I bought a new 52mm Throttle Body from Bus Labs. This unit: Let me know how this works out. It has been many years since I did mine using the stock 2.1 50mm throttle body, but I vaguely remember having to swap the arm on the throttle shaft for the one off the 1.8 in order to get the proper orientation. Hoping the aftermarket shaft is of the same design to allow this. |
|
|
|
| VaccaRabite |
May 4 2021, 10:47 AM
Post
#18
|
|
En Garde! Group: Admin Posts: 13,419 Joined: 15-December 03 From: Dallastown, PA Member No.: 1,435 Region Association: MidAtlantic Region |
QUOTE(JamesM @ May 4 2021, 10:48 AM) Let me know how this works out. It has been many years since I did mine using the stock 2.1 50mm throttle body, but I vaguely remember having to swap the arm on the throttle shaft for the one off the 1.8 in order to get the proper orientation. Hoping the aftermarket shaft is of the same design to allow this. I figured it may just be easier to move the throttle cable to the centerline using something similar to the set up I used when I had carbs. I’ll be able to play with it more when I get it. Zach |
|
|
|
| VaccaRabite |
May 7 2021, 06:19 PM
Post
#19
|
|
En Garde! Group: Admin Posts: 13,419 Joined: 15-December 03 From: Dallastown, PA Member No.: 1,435 Region Association: MidAtlantic Region |
The GoWesty unit is pretty awesome, and converting it was a piece of cake. This unit is 52mm at the butterfly. This makes it larger then the 1.8 914 TB (45mm) and larger then the 2.1 Wasserboxer TB that people usually swap over (50mm). Also, this unit is MUCH EASIER to swap then the 2.1TB, had double bearings for the throttle shaft and is BRAND NEW not 40 years old and worn out.
Here is how I went about doing it: (IMG:http://www.914world.com/bbs2/uploads_offsite/live.staticflickr.com-1435-1620433145.1.jpg) First thing to notice for these units: Stock 1.8 L-jet in on the left, GoWesty on the right. THE FLATS ARE THE SAME! The throttle arm on the GoWesty is angeld all wrong for a 914, so off it must come. We are going to cut up this nice shiny new piece of metal. We will need bits from the 1.8 throttle - in particular the arm for the barrel nut. (IMG:http://www.914world.com/bbs2/uploads_offsite/live.staticflickr.com-1435-1620433146.2.jpg) Mocking up the old arm, you can see it takes the PERFECT angle on the new TB, versus the bus arm that is far too low. But the bus arm has the throttle stops, so we don't want to eliminate it completely. (IMG:http://www.914world.com/bbs2/uploads_offsite/live.staticflickr.com-1435-1620433146.3.jpg) Here are the cut lines. We preserve both throttle stops on the GoWesty piece, and just take off the nub on the 914 L-jet piece. (IMG:http://www.914world.com/bbs2/uploads_offsite/live.staticflickr.com-1435-1620433147.4.jpg) Boom! perfect! Lower arm controls the throttle stops, upper will attach to the throttle. I also preserved the lug to mount an aux return spring since the GWesty unit has a weaker spring and may need help. (IMG:http://www.914world.com/bbs2/uploads_offsite/live.staticflickr.com-1435-1620433147.5.jpg) another view of the top put back together. (IMG:http://www.914world.com/bbs2/uploads_offsite/live.staticflickr.com-1435-1620433147.6.jpg) And mocked on to the plenum. Perfection. (IMG:http://www.914world.com/bbs2/uploads_offsite/live.staticflickr.com-1435-1620433148.7.jpg) lower half of the GoWesty unit. This is where things get really awesome. I have already remove the Vanagon 2 position switch from the shaft. Look at those nice threaded holes. I wonder.... (IMG:http://www.914world.com/bbs2/uploads_offsite/live.staticflickr.com-1435-1620433148.8.jpg) the shaft is 4.5mm too long for the Microsquirt TPS to fit without a spacer. So I marked it and cut it to size. I DID NOT remove the throttle shaft from the throttle body, just cut it in place. Still really easy. (IMG:http://www.914world.com/bbs2/uploads_offsite/live.staticflickr.com-1435-1620433148.9.jpg) BOOM! The TPS was able to use the two drilled and tapped holes on the GoWesty plate. Its almost like they planned for this kind of modification. (IMG:http://www.914world.com/bbs2/uploads_offsite/live.staticflickr.com-1435-1620433148.10.jpg) and here we have the ONLY sticking point. My friends at the shop up the street got a little too aggressive with the expander die, and took the intake horn on the Plenum from 45 to 55mm - but they left me no taper to go into the TB. So I am slowly tap-tap-tapping the opening with a small engraving chase hammer and putting a taper back into the opening. I MAY need to trim it a little too. But I'm going to slowly keep tapping until I reshape the opening to 52mm and see how the TB fits. Even the work that I have done in this picture has helped a TON. I am not planning on using the rubber gasket, but using a RTV gasket sealant instead. Zach |
|
|
|
| VaccaRabite |
May 8 2021, 08:37 PM
Post
#20
|
|
En Garde! Group: Admin Posts: 13,419 Joined: 15-December 03 From: Dallastown, PA Member No.: 1,435 Region Association: MidAtlantic Region |
After my test drive tonight the idle was still a little high. I decided to run the smoke machine again since I found and fixed the larger leak on the throttle body.
I found one of the tube connectors leaking from the plenum to the intake runners, and found a pinhole on a gasket at the plenum. I doubt the pinhole was doing much, but it’s easy enough to fix so I will. There were no leaks at all with the new GoWesty TB. I figured there may be one at the join of the TB to the Plenum. But that area was sealed very well. Since I have to wait and install a new throttle cable (!!!!) I’ll have plenty of time to put some hose clamps on the connectors and put a little RTV into the pinhole where the cold start injector used to be. |
|
|
|
|
1 User(s) are reading this topic (1 Guests and 0 Anonymous Users)
0 Members:

|
Lo-Fi Version | Time is now: 18th April 2024 - 06:58 PM |
Invision Power Board
v9.1.4 © 2024 IPS, Inc.