|
|
|
Porsche, and the Porsche crest are registered trademarks of Dr. Ing. h.c. F. Porsche AG.
This site is not affiliated with Porsche in any way. Its only purpose is to provide an online forum for car enthusiasts. All other trademarks are property of their respective owners. |
|
|

  |

| Literati914 |
 Oct 24 2019, 07:56 PM Oct 24 2019, 07:56 PM
Post
#1
|
|
Senior Member  Group: Members Posts: 1,775 Joined: 16-November 06 From: Dallas, TX Member No.: 7,222 Region Association: Southwest Region |
I've been putting this off, but I guess I should document the restoration build for my latest 914. I finally got the car on my property and even though there no garage (YET) I can go ahead and get some things started. This will be my 3rd 914 and it'll be a bit of a second chance for this car, as it has a front end section that's been grafted on (by PO) because of a previous accident - not to mention the rusted away hell-hole and holes in the floor. The graft actually looks pretty well done and solid, and the other items will be addressed. The car came with it's original engine - a 1.7 that's freshly rebuilt with zero miles on the rebuild (uninstalled). I've also got a 2056cc 'GA' motor that'll probably end up in this car.
The car was originally L21E Tangerine and someone's gone over it with a real crappy red paint. Since my last 914(/6) was L21E Tangerine.. I'm going to paint this one something else, and will be doing all bodywork and paint myself. This "restoration" will be considered a driver quality effort.. but I don't plan on cutting too many corners either. I plan to do a quality job but it won't be going across the block at Christies either. Lots of parts have already been sourced, but there's always more, right! Here's the BEFORE shots: (IMG:http://www.914world.com/bbs2/uploads_offsite/i.postimg.cc-7222-1571968560.1.jpg) |
   |

 
|
| Literati914 |
Oct 24 2019, 08:04 PM
Post
#2
|
|
Senior Member Group: Members Posts: 1,775 Joined: 16-November 06 From: Dallas, TX Member No.: 7,222 Region Association: Southwest Region |
UGLY FLOORS:
(IMG:http://www.914world.com/bbs2/uploads_offsite/i.postimg.cc-7222-1571969093.1.jpg) (IMG:http://www.914world.com/bbs2/uploads_offsite/i.postimg.cc-7222-1571969094.2.jpg)direct link upload images (IMG:http://www.914world.com/bbs2/uploads_offsite/i.postimg.cc-7222-1571969094.3.jpg)photo upload site (IMG:http://www.914world.com/bbs2/uploads_offsite/i.postimg.cc-7222-1571969094.4.jpg) (IMG:http://www.914world.com/bbs2/uploads_offsite/i.postimg.cc-7222-1571969095.5.jpg) HELL HOLE: (IMG:http://www.914world.com/bbs2/uploads_offsite/i.postimg.cc-7222-1571969095.6.jpg) RUSTY FENDER TIPS:(IMG:http://www.914world.com/bbs2/uploads_offsite/i.postimg.cc-7222-1571969095.7.jpg) (IMG:http://www.914world.com/bbs2/uploads_offsite/i.postimg.cc-7222-1571969096.8.jpg) |
|
|
|
| PlaysWithCars |
Oct 25 2019, 12:21 AM
Post
#3
|
|
Senior Member Group: Members Posts: 531 Joined: 9-November 03 From: Southeast of Seattle Member No.: 1,323 Region Association: Pacific Northwest |
You've got your hands full with that one. Always good to see another saved though.
|
|
|
|
| Literati914 |
Dec 10 2019, 07:31 PM
Post
#4
|
|
Senior Member Group: Members Posts: 1,775 Joined: 16-November 06 From: Dallas, TX Member No.: 7,222 Region Association: Southwest Region |
I've not been doing much of anything to my 914 project lately, what with all the rain, weather and me doing over 200ft of cedar fencing (single handedly at that), etc. Anyway, I took some time yesterday and was able to get out there and cut away all the rusted metal from the Hell Hole. So, that's a little piece of progress I can report on (IMG:style_emoticons/default/sawzall-smiley.gif) . Here's a shot of it:
(IMG:http://www.914world.com/bbs2/uploads_offsite/i.postimg.cc-7222-1576027892.1.jpg) |
|
|
|
| Literati914 |
Dec 10 2019, 07:34 PM
Post
#5
|
|
Senior Member Group: Members Posts: 1,775 Joined: 16-November 06 From: Dallas, TX Member No.: 7,222 Region Association: Southwest Region |
Here's my replacement metal test fit:
(IMG:http://www.914world.com/bbs2/uploads_offsite/i.postimg.cc-7222-1576028058.1.jpg)upload image to url |
|
|
|
| ClayPerrine |
Dec 11 2019, 10:14 PM
Post
#6
|
|
Life's been good to me so far..... Group: Admin Posts: 15,946 Joined: 11-September 03 From: Hurst, TX. Member No.: 1,143 Region Association: NineFourteenerVille |
When can I come by and see it? I can bring a 914 for some motivation.....
(IMG:style_emoticons/default/driving.gif) (IMG:style_emoticons/default/driving-girl.gif) |
|
|
|
| rjames |
Dec 12 2019, 11:53 AM
Post
#7
|
|
I'm made of metal Group: Members Posts: 4,157 Joined: 24-July 05 From: Shoreline, WA Member No.: 4,467 Region Association: Pacific Northwest |
QUOTE(Literati914 @ Dec 10 2019, 05:34 PM)  Here's my replacement metal test fit: (IMG:http://www.914world.com/bbs2/uploads_offsite/i.postimg.cc-7222-1576028058.1.jpg)upload image to url Nice work on making/forming that patch! |
|
|
|
| Literati914 |
Jan 24 2020, 11:59 PM
Post
#8
|
|
Senior Member Group: Members Posts: 1,775 Joined: 16-November 06 From: Dallas, TX Member No.: 7,222 Region Association: Southwest Region |
QUOTE(ClayPerrine @ Dec 11 2019, 10:14 PM) When can I come by and see it? I can bring a 914 for some motivation..... (IMG:style_emoticons/default/driving.gif) (IMG:style_emoticons/default/driving-girl.gif) Wow, would love to have you out this way.. just gotta let me get a driveway poured first, it's in the planning stage.. but it's just a big strip of mud and gravel most days. Your 914 would NOT care for it. This 914 'build' will probably take forever with all the home improvement going on (thats what we get for buying a fixer upper (IMG:style_emoticons/default/headbang.gif) ). Still, I'd like to have it painted before summer. Here's part of the fence I've been building, and that's been taking up my spare time: (IMG:http://www.914world.com/bbs2/uploads_offsite/i.postimg.cc-7222-1579931952.1.jpg) |
|
|
|
| Literati914 |
Jan 25 2020, 12:08 AM
Post
#9
|
|
Senior Member Group: Members Posts: 1,775 Joined: 16-November 06 From: Dallas, TX Member No.: 7,222 Region Association: Southwest Region |
I was able to mess with the 914 a couple days since my last update. I've cut the rusted thru parts of the floors out:
(IMG:http://www.914world.com/bbs2/uploads_offsite/i.postimg.cc-7222-1579932496.1.jpg) I've got the panels already and picked up some Mig gas for welding, the other day. |
|
|
|
| Literati914 |
Jan 25 2020, 12:15 AM
Post
#10
|
|
Senior Member Group: Members Posts: 1,775 Joined: 16-November 06 From: Dallas, TX Member No.: 7,222 Region Association: Southwest Region |
Also, I've removed all of the suspension.. for bushing, bearing, seal replacement - but also for under car clean up and painting. This car will not be on a rotisserie, I plan to wire wheel the entire underside, treat with phosphoric acid, epoxy and paint, or bed liner stuff, or both.
(IMG:http://www.914world.com/bbs2/uploads_offsite/i.postimg.cc-7222-1579932925.1.jpg) |
|
|
|
| ssuperflyoldguy |
Jan 25 2020, 01:10 AM
Post
#11
|
|
Member Group: Members Posts: 173 Joined: 15-November 15 From: NorCal - East Bay Baby! Member No.: 19,364 Region Association: None |
Looks like you used galvanized- bravo.
|
|
|
|
| Literati914 |
Jan 25 2020, 09:02 PM
Post
#12
|
|
Senior Member Group: Members Posts: 1,775 Joined: 16-November 06 From: Dallas, TX Member No.: 7,222 Region Association: Southwest Region |
I busted most of the front suspension apart today. Gotta figure out how to get those bushings off the A-arms and the joints out of them too. Couldn't budge the dang set screws in the REAR discs rotors, so I just called it a day (IMG:style_emoticons/default/beer3.gif)
(IMG:http://www.914world.com/bbs2/uploads_offsite/i.postimg.cc-7222-1580007770.1.jpg) |
|
|
|
| mepstein |
Jan 25 2020, 09:09 PM
Post
#13
|
|
914-6 GT in waiting Group: Members Posts: 19,640 Joined: 19-September 09 From: Landenberg, PA/Wilmington, DE Member No.: 10,825 Region Association: MidAtlantic Region |
Put a torch on the bushy gs until they smoke and then turn them off with a screwdriver stuck in the hole on the mounting tab.
Heat will loosen the set screw. It’s worth it to go to your local home store and buy a map torch. Heat makes everything loosen up. |
|
|
|
| KELTY360 |
Jan 25 2020, 10:20 PM
Post
#14
|
|
914 Neferati Group: Members Posts: 5,093 Joined: 31-December 05 From: Pt. Townsend, WA Member No.: 5,344 Region Association: Pacific Northwest |
QUOTE(Literati914 @ Dec 10 2019, 05:34 PM) Here's my replacement metal test fit: (IMG:http://www.914world.com/bbs2/uploads_offsite/i.postimg.cc-7222-1576028058.1.jpg)upload image to url Nice patch! Don't forget the drain hole. |
|
|
|
| Literati914 |
Jan 25 2020, 10:41 PM
Post
#15
|
|
Senior Member Group: Members Posts: 1,775 Joined: 16-November 06 From: Dallas, TX Member No.: 7,222 Region Association: Southwest Region |
QUOTE(mepstein @ Jan 25 2020, 09:09 PM) Put a torch on the bushy gs until they smoke .. go to your local home store and buy a map torch. Heat makes everything loosen up. Will do, thanks. What about the ball joint thingy that attaches to the strut - does it take a special tool to remove? QUOTE(KELTY360 @ Jan 25 2020, 10:20 PM) Nice patch! Don't forget the drain hole. Yea, planning on adding one before welding it in. |
|
|
|
| bkrantz |
Jan 26 2020, 10:06 PM
Post
#16
|
|
914 Guru Group: Members Posts: 8,173 Joined: 3-August 19 From: SW Colorado Member No.: 23,343 Region Association: Rocky Mountains |
Nice work. Every hour and step is progress.
|
|
|
|
| Literati914 |
Mar 19 2020, 08:08 PM
Post
#17
|
|
Senior Member Group: Members Posts: 1,775 Joined: 16-November 06 From: Dallas, TX Member No.: 7,222 Region Association: Southwest Region |
OK - made some small progress lately.
So the general plan is this (since I'm working on this car with NO garage). Phase 1 is as follows: 1) pull and restore all the suspension. 2) weld in new floor areas & interior firewall sections. 3) remove dash 4) prime interior 5) address the entire underside of the car, wire wheel, prime, paint, etc. 6) repair: hell hole, damage to shifter hole & clutch cable hole - in engine compartment. 7) prime engine compartment. 8) address the front trunk including to cut out area for A/C condenser. What I've been working at lately is.. getting the area under the rear trunk scrubbed down with a nylon 'wire wheel'. I really like the nylon wheel for this because it lasts forever, stays cool, is cheap and leaves an 80 grit texture which is good for the epoxy primer that'll be coming next (I will not be taking this all the way down to bare metal - not necessary). Here's the nylon wheel: (IMG:http://www.914world.com/bbs2/uploads_offsite/i.postimg.cc-7222-1584670136.1.jpg) ..AND one of the major hurdles has been removing the muffler heat shield (so I could get above it for rust treatment and paint. They'll tell you it's only spot welded in, but mine also had small strips of edge welding - I'll be bolting it back in:(IMG:http://www.914world.com/bbs2/uploads_offsite/i.postimg.cc-7222-1584670137.2.jpg) ..Here's a shot showing under the trunk floor after nylon wheeling it. I'll be scuffing all the nooks and crannies with maroon scotch-brite pads and phosporic acid solution before epoxy primer. BEFORE: (IMG:http://www.914world.com/bbs2/uploads_offsite/i.postimg.cc-7222-1584670138.3.jpg) AFTER:(IMG:http://www.914world.com/bbs2/uploads_offsite/i.postimg.cc-7222-1584670138.4.jpg) Also I've gotten up inside the fenders/wheel wells and removed all of the foam that's known to eventually cause rust. Mine look pretty good at this point. The job sucks but glad I did it, and got it out of the way: DURING(IMG:http://www.914world.com/bbs2/uploads_offsite/i.postimg.cc-7222-1584670138.5.jpg) REMOVED:(IMG:http://www.914world.com/bbs2/uploads_offsite/i.postimg.cc-7222-1584670139.6.jpg) |
|
|
|
| Literati914 |
Jul 26 2021, 09:15 PM
Post
#18
|
|
Senior Member Group: Members Posts: 1,775 Joined: 16-November 06 From: Dallas, TX Member No.: 7,222 Region Association: Southwest Region |
I know, I'm honestly terrible with documenting my project.. in my defense I did accidently crush my old android phone, that had a ton of pictures documenting the work so far on my project#1 914. So, I'm going to try to catch uo with what little I do have. Here's a shot showing the body stripped down to bare metal, with as little filler (kitty hair in this case) as possible, before epoxy primer.
. Attached thumbnail(s) 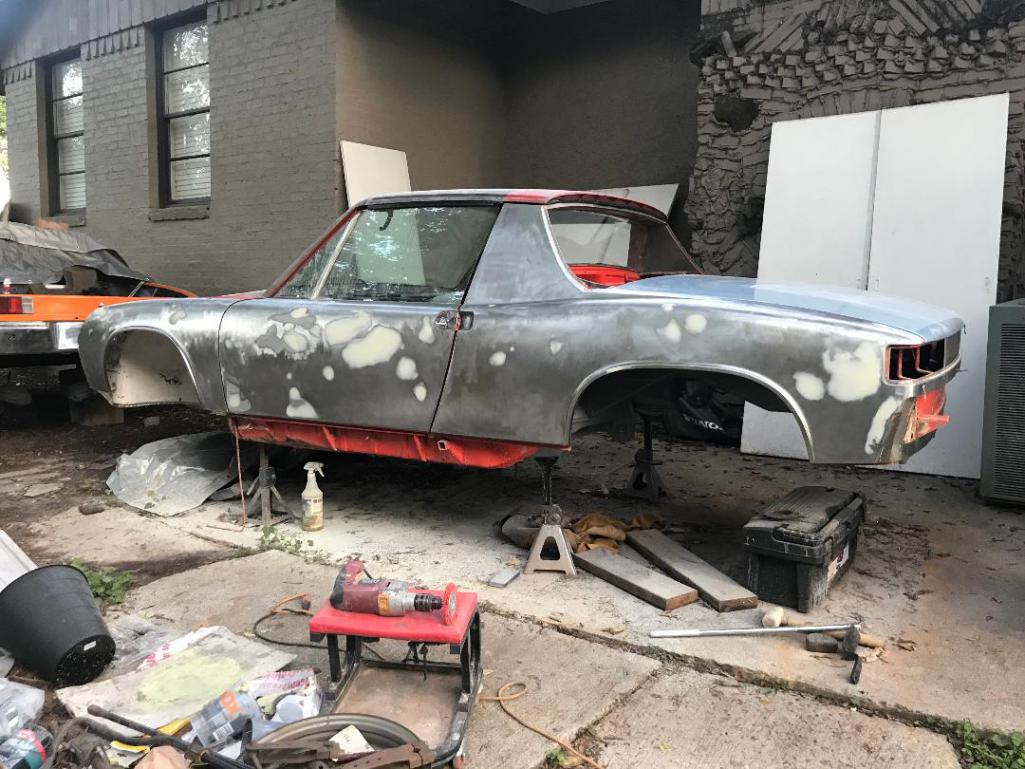
|
|
|
|
| Literati914 |
Jul 26 2021, 09:25 PM
Post
#19
|
|
Senior Member Group: Members Posts: 1,775 Joined: 16-November 06 From: Dallas, TX Member No.: 7,222 Region Association: Southwest Region |
We're obviously in Epoxy primer and.. Got my rotisserie built and the car mounted:
Attached thumbnail(s) 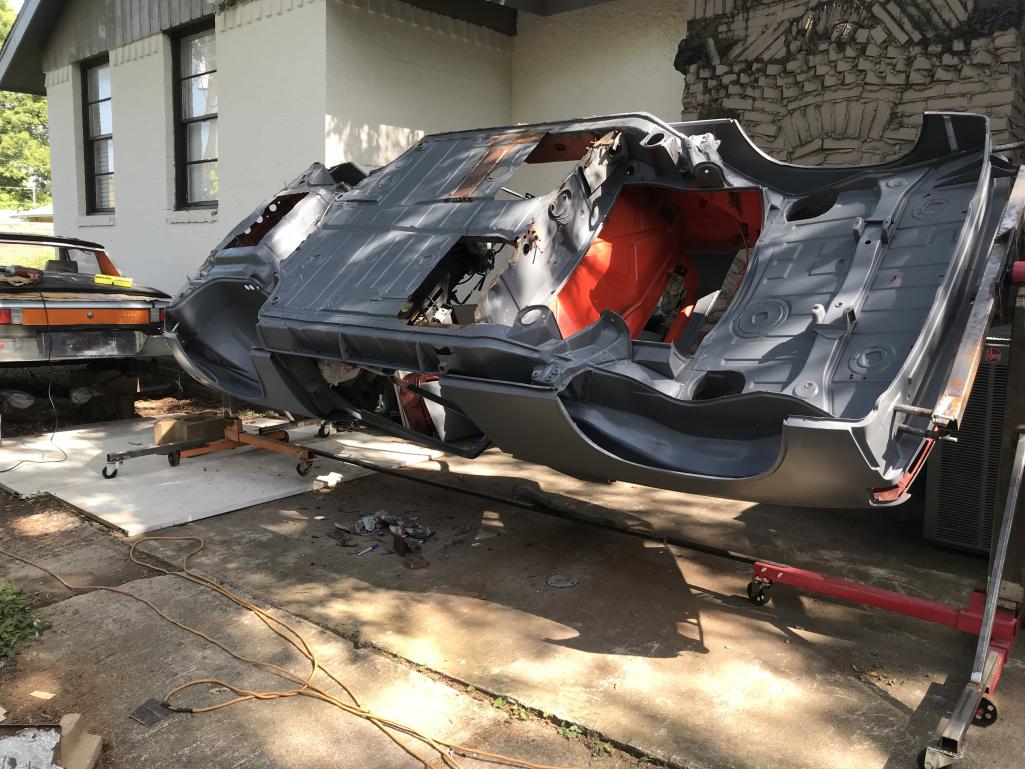
|
|
|
|
| Literati914 |
Jul 26 2021, 09:36 PM
Post
#20
|
|
Senior Member Group: Members Posts: 1,775 Joined: 16-November 06 From: Dallas, TX Member No.: 7,222 Region Association: Southwest Region |
Oh yeah, before it got on the rotisserie I had to address the fender to cowling issues... both fender's "pointy tips" by the cowl, were rotting away. I cut them off and welded on replacements:
Before, during - Attached thumbnail(s)  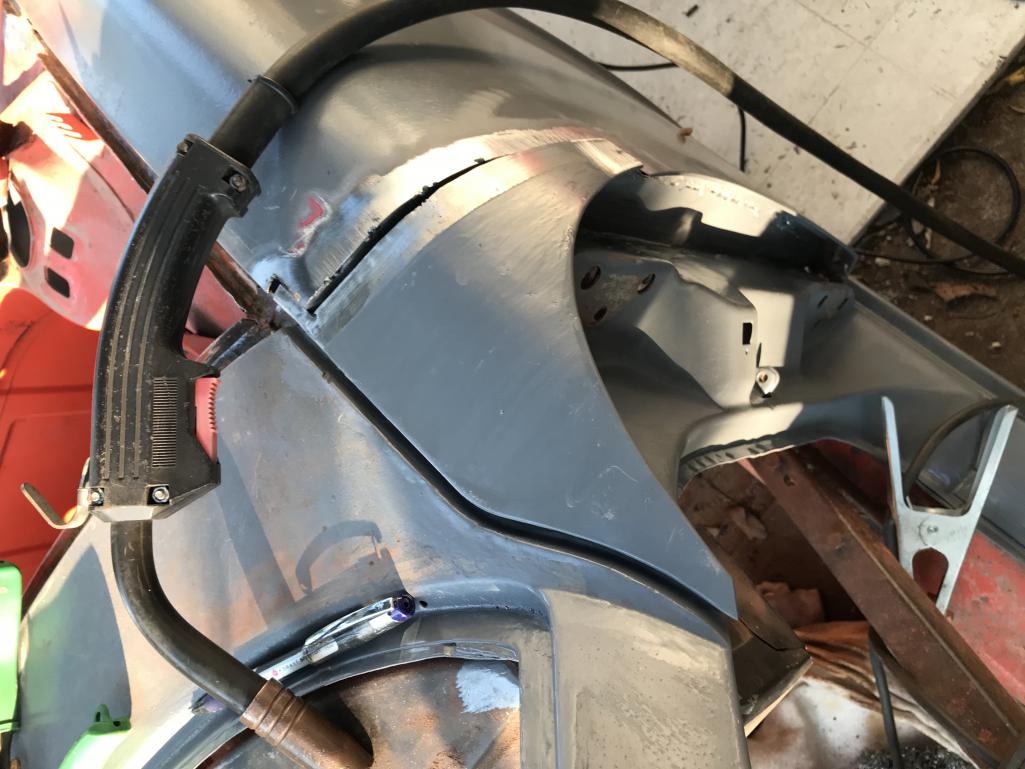
|
|
|
|
|
1 User(s) are reading this topic (1 Guests and 0 Anonymous Users)
0 Members:

|
Lo-Fi Version | Time is now: 21st December 2024 - 04:47 AM |
Invision Power Board
v9.1.4 © 2024 IPS, Inc.